

저 아래 보시면 기본 공유기 세팅 이란 글이 있습니다.
그대로 하시면 공유는 되는데 추가로..vpn서버를 원하시는 분들이 많아서 저도 똑같은거 여러번 답하기에 귀차니즘이 발동하야.. 이글을 올립니다 모쪼록 회사에서 증권 열심히 하시고 엄한짓도 많이 해보시길...
먼저 미크로틱 설정툴인 winbox는 이미 보신적 있다고 가정하고..
버젼 5.1 이상이면 아래 글이 다 적용될겁니다.
자신의 설정을 보는방법은 winbox 에서 터미널 하나 열고..
export compact file 원하는파일명 "엔터" 하시면 조금 버벅거린후 전체 설정이 스토리지에 저장됩니다.
이제 winbox 메뉴의 file 에 가시면 방금 생성하신 파일이 보일겁니다. 이걸 마우스로 콕 찝어서 내컴퓨터로 드레그 하시면 복사가 됩니다. 보통 확장자는 .rsc 로 저장이 됩니다.
만일 아래 공유기 세팅대로 다하신 상태시고..
이 파일을 메모장 등에서 열어보시면..
아래와 같이 보일겁니다.
/interface ethernet ;;;;;여기가 ether2를 마스터로 지정해서 2,3,4,5를 lan스위치로 만들어주는 거였죠
set 2 master-port=ether2
set 3 master-port=ether2
set 4 master-port=ether2
/ip pool ;;; 사용자들이 사용할 아이피 영역을 지정해준거구요..
add name=dhcp_pool1 ranges=192.168.254.2-192.168.254.254
/ip dhcp-server ;;;;;; 사용자 dhcp서버를 설정하는거구요
add address-pool=dhcp_pool1 disabled=no interface=ether2 name=dhcp1
/ip address ;사용자들이 사용할 게이트웨이 주소를 지정하는거지요.
add address=192.168.254.1/24 interface=ether2
/ip dhcp-client ;;;;;이건 ether1에 인터넷 선 연결해서 공인아이피 받아오는 설정이구요..
add default-route-distance=0 disabled=no interface=ether1
/ip dhcp-server network ;;;;;;사용자 아이피 영역을 지정하는거구요
add address=192.168.254.0/24 gateway=192.168.254.1
/ip firewall nat ;;;이게 소스낫 을 사용해서 공유기 기능을 키는거구요..
add action=masquerade chain=srcnat out-interface=ether1
아래 장황하게 그림으로 보여드렸지만 실제 설정한건 이게 답니다.
여기에 pptp 서버를 설정하는것을 추가하면 아래처럼 변합니다 달라지는걸 살펴보지요.빨간색 글자들이 변하거나 새로 생긴겁니다.
/interface ethernet
set 0 arp=proxy-arp ;;;;;없던게 생겼지요? 이건 필수는 아니고 집에 컴들과 자료 공유하시려면 필요한겁니다.
set 2 master-port=ether2 ;;;;단순히 집에 공인주소를을 통해 인터넷을 사용하실려면 안해도 됩니다.
set 3 master-port=ether2
set 4 master-port=ether2
/ip pool
add name=dhcp_pool1 ranges=192.168.254.2-192.168.254.250 ;;;;;;;원래는 254까지였는데 250으로 줄입니다.
add name=pptp_pool ranges=192.168.254.251-192.168.254.254 ;;;;;;;그리고251~254 4개를 pptp로 할당합니다.
/ip dhcp-server
add address-pool=dhcp_pool1 disabled=no interface=ether2 name=dhcp1
/ppp profile ;;;;pptp서버에서 사용할 프로필을 지정해 줍니다.
set 0 dns-server=168.126.63.1,168.126.63.2 local-address=59.11.85.248 remote-address=pptp_pool
;;;;;;;이부분이 좀 중요한데 사용자들이 사용할 dns서버도 지정해주고.. 서버가 될 장비의 주소를 사설이 아니라 dhcp-client 에서 받아온 ether1의 공인 주소를 직접 적어줍니다...여러가지 해본결과 이게 제일 심플 합니다. 그리고 마지막으로 원격에서 접속할 사용자에게 할당할 주소를 미리 만들어둔 pptp_pool로 지정해 줍니다.
/interface pptp-server server ;;;;;;이부분은 뭐 pptp vpn 서버를 활성화 하는 겁니다. 여기서 사용할 profile 은 꼭 위에 ppp propile 에서 설정했던 그놈을 선택해주셔야 합니다.
set authentication=pap,chap,mschap1,mschap2 default-profile=default enabled=yes
set authentication=pap,chap,mschap1,mschap2 default-profile=default enabled=yes
/ip address
add address=192.168.254.1/24 interface=ether2
/ip dhcp-client
add default-route-distance=0 disabled=no interface=ether1
/ip dhcp-server network
add address=192.168.254.0/24 gateway=192.168.254.1
/ip firewall nat
add action=masquerade chain=srcnat out-interface=ether1
/ppp secret ;;;;; 마지막으로 원격에서 접속할 사용자 아이디와 비번을 생성해 줍니다. 여기서는 둘다 ppp1
add name=ppp1 password=ppp1
이거 다되고 나면 윈도 내장된 vpn클라이언트로 접속하시면 됩니다.
단순히 집에 컴과 파일 공유만 하실거면...
아래처럼 처음에 보여드린 ether1 에 대해 arp 부분 꼭 설정하시고...
/interface ethernet
set 0 arp=proxy-arp
set 0 arp=proxy-arp
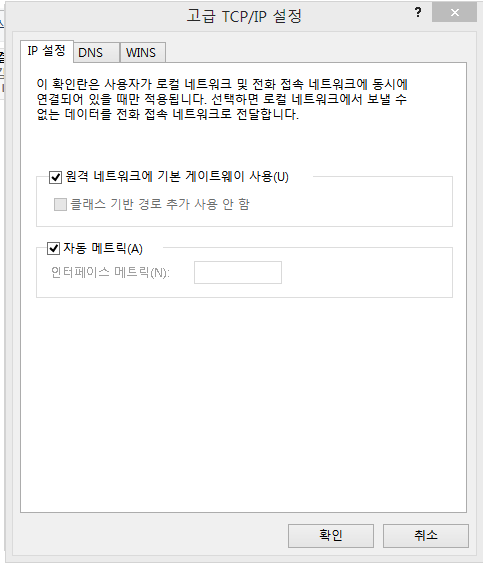
파일공유는 하되 인터넷은 그냥 삼실꺼 쓰실꺼면..
프로그램 접속하실때 원격네트워크의 기본게이트웨이 사용 체크박스 지워버리시면 됩니다.
xp의 경우
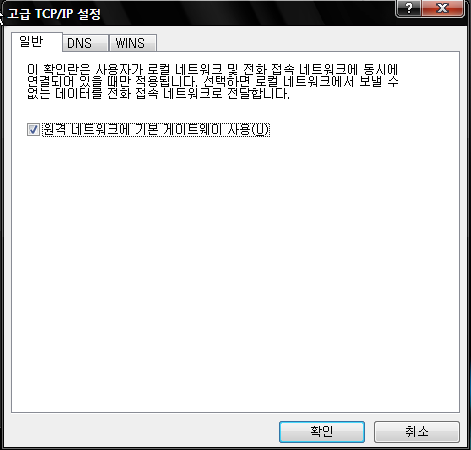
윈7의 경우
모쪼록 도움이 되셨길..
아 결과적으로 새로운 설정을 적용하실려면 기존꺼장비기준으로 아래꺼 그냥 복사해서.. 윈박스에서 터미널 열고
그냥 붙여넣기 하시면 됩니다.
/interface ethernet
set 0 arp=proxy-arp
set 0 arp=proxy-arp
/ip pool
remove 0
remove 0
;;;;;;;;;;;;;이게..기존의 2~254 로 설정된거 지워버리는 겁니다.
add name=dhcp_pool1 ranges=192.168.254.2-192.168.254.250
add name=pptp_pool ranges=192.168.254.251-192.168.254.254
/ppp profile
set 0 dns-server=168.126.63.1,168.126.63.2 local-address=59.11.85.248 remote-address=pptp_pool
/interface pptp-server server
/ppp profile
set 0 dns-server=168.126.63.1,168.126.63.2 local-address=59.11.85.248 remote-address=pptp_pool
/interface pptp-server server
set authentication=pap,chap,mschap1,mschap2 default-profile=default enabled=yes
/ppp secret
/ppp secret
add name=ppp1 password=ppp1
-초인을 꿈꾸는 범부, 일탈을 꿈꾸는 생활인,깨어나기 두려우나 모든것이 꿈이기를 꿈꾸는 나비-
공유기의 지존이라는 .. 미크로틱 ... 운용하려면 만만치않은 내공이 필요해보입니다.
~~~
/ip pool
add name=dhcp_pool1 ranges=192.168.254.2-192.168.254.250 ;;;;;;;원래는 254까지였는데 250으로 줄입니다.
add name=pptp_pool ranges=192.168.254.251-192.168.254.254 ;;;;;;;그리고251~254 4개를 pptp로 할당합니다.
/ip dhcp-server
add address-pool=dhcp_pool1 disabled=no interface=ether2 name=dhcp1
~~~
위 설정중 마지막 라인이... 아래와 같이 변해야 되지 않나요?
/ip dhcp-server
add address-pool=pptp_pool disabled=no interface=ether2 name=dhcp2
그럼 아래 명령어쪽에서 remote-address 설정항목이 IP Pool을 받아오는 것을 설정하는 것인가요?
즉, PPTP서버로 로그인된 사용자에 대한 DHCP서버 범위를 IP Pool로 받아오는 것이 맞나요 ?
/ppp profile ;;;;pptp서버에서 사용할 프로필을 지정해 줍니다.
set 0 dns-server=168.126.63.1,168.126.63.2 local-address=59.11.85.248 remote-address=pptp_pool
pptp 사용자들은 pptp_pool 로 지정된것에서 받아갑니다. 예를들어 사용자1 이 처음으로 접속하면 뒤에서 부터 해서 254번을 받아가고 다음은 253 그다음 252 이런식이 되고 그사이 254번 쓴 ㄴ사용자가 접속 종료하면 그다음 사용자가 다시 254번을 사용하게 됩니다.
마지막 요약에서
/interface pptp-server serverset authentication=pap,chap,mschap1,mschap2 default-profile=default enabled=yes
내용중에서 serverset -> server set 으로 수정되어야 하네요 ^^
도움 받으신 분들 다음에 이진님에게 막걸리나 소주 한잔씩 쏘세요..
이자(?)가 자꾸 붙는듯...- 마음의 짐... 휴우....
"이진"님,,, 시간내서 [정독]하고 잘 배우겠습니다... 고맙습니다! (추천)
...
set 0 arp=proxy-arp 이 설정은 아주 유용하겠네요^^
PPTP 예전부터 해보고 있는데 왜 파일공유가 안되나 했더니
/interface ethernet
set 0 arp=proxy-arp 가 안되었기 때문이었네요..
속도 잘 나와서 너무 다행입니다.
고맙습니다^^
저처럼 고생하지 마시라고 답글 답니다 !