* Asrock J5040 , Debian 11 에서 작업했음.
< 주의 > 아직은 인텔 랜드라이버등 확장 드라이버를 사용하면 새로운 SATAPortMapping과 충돌이 일어나서
DSM이 하드 디스크를 인식하지 못하게 됨. 리얼텍 랜만 가능함.
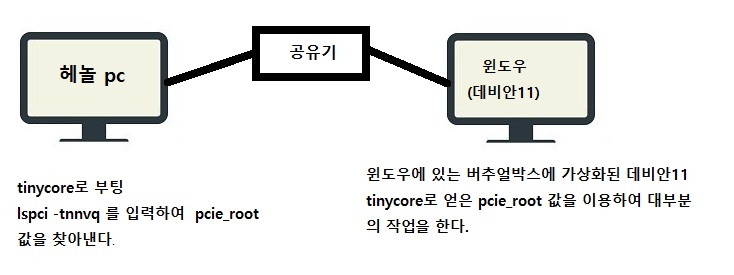
1 ) tinycore로 Asrock J5040 을 부팅해서 "output.dts" 파일의 pcie_root 값을 알아보자.
tc@box:~$ lspci -tnnvq
-[0000:00]-+-00.0 Intel Corporation Gemini Lake Host Bridge [8086:31f0]
+-00.1 Intel Corporation Celeron/Pentium Silver Processor Dynamic Platform and Thermal Framework Processor Participant [8086:318c]
+-02.0 Intel Corporation GeminiLake [UHD Graphics 605] [8086:3184]
+-0e.0 Intel Corporation Celeron/Pentium Silver Processor High Definition Audio [8086:3198]
+-0f.0 Intel Corporation Celeron/Pentium Silver Processor Trusted Execution Engine Interface [8086:319a]
+-12.0 Intel Corporation Celeron/Pentium Silver Processor SATA Controller [8086:31e3]
+-13.0-[01]--+-00.0 Intel Corporation 82575EB Gigabit Network Connection [8086:10a7]
| \-00.1 Intel Corporation 82575EB Gigabit Network Connection [8086:10a7]
+-13.1-[02]----00.0 JMicron Technology Corp. JMB58x AHCI SATA controller [197b:0585]
+-13.2-[03]----00.0 Realtek Semiconductor Co., Ltd. RTL8111/8168/8411 PCI Express Gigabit Ethernet Controller [10ec:8168]
+-13.3-[04]----00.0 ASMedia Technology Inc. ASM1062 Serial ATA Controller [1b21:0612]
+-15.0 Intel Corporation Celeron/Pentium Silver Processor USB 3.0 xHCI Controller [8086:31a8]
+-1f.0 Intel Corporation Celeron/Pentium Silver Processor LPC Controller [8086:31e8]
\-1f.1 Intel Corporation Celeron/Pentium Silver Processor Gaussian Mixture Model [8086:31d4]
tc@box:~$
2 )위의 문장을 보고 첨부한 "output.dts" 파일에 들어갈 아래 값( SATA Controller 주소)들을 정한다.
pcie_root = "00:12.0"
pcie_root = "00:13.1,00.0"
pcie_root = "00:13.3,00.0"

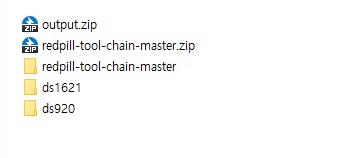
첨부한 "outout.zip" 압축파일을 풀어서 ds1621( DS920 ) 폴더 속에 있는 "output.dts" 파일을 에디터로 아래처럼 수정한다.
( 저의 ASROCK J5040은 SATA 확장카드 포함해서 SATA Controller 3개 이고 각각 2개의 포트가 있음)
pcie_root = "00:12.0";
ata_port = <0x00>;
pcie_root = "00:12.0";
ata_port = <0x01>;
pcie_root = "00:13.1,00.0";
ata_port = <0x00>;
pcie_root = "00:13.1,00.0";
ata_port = <0x01>;
pcie_root = "00:13.3,00.0";
ata_port = <0x00>;
pcie_root = "00:13.3,00.0";
ata_port = <0x01>;
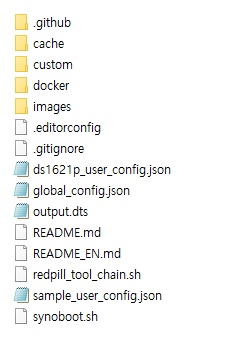
3) 수정된 "output.dts" 파일을 redpill-tool-chain-master 폴더 속에 넣는다.
https://github.com/tossp/redpill-tool-chain 에서 다운로드한뒤 압축을 푼다.
redpill-tool-chain-master 폴더 속에 들어 있는 "sample_user_config.json" 파일을 자신의 시스템에 맞게 수정한 후에
이름을 "ds1621p_user_config.json" 로 바꾸어 저장한다.

4) redpill-tool-chain-master 폴더 를 debian 11에 복사해서 넣는다.
5) 아래 절차로 작업을 한다.
sudo apt-get update
sudo apt install docker.io
sudo apt install jq
sudo apt install curl
sudo apt install device-tree-compiler
cd /home/dolbycat/redpill-tool-chain-master
chmod +x redpill_tool_chain.sh
./redpill_tool_chain.sh add https://github.com/jumkey/redpill-load/raw/develop/redpill-dtb/rpext-index.json
./redpill_tool_chain.sh build ds1621p-7.0.1-42218
./redpill_tool_chain.sh auto ds1621p-7.0.1-42218
dtc -I dts -O dtb output.dts > model_ds1621p.dtb
cp model_ds1621p.dtb ./custom/extensions/jumkey.dtb/ds1621p_42218
./redpill_tool_chain.sh auto ds1621p-7.0.1-42218
6) "images" 폴더에서 첫 번째 "redpill-DS1621+_7.0.1-xxxxxxxx.img" 파일을 삭제하고,
두 번째로 생성된 redpill-DS1621+_7.0.1-xxxxxxxx.img 파일을 사용합니다.
< 참고 >
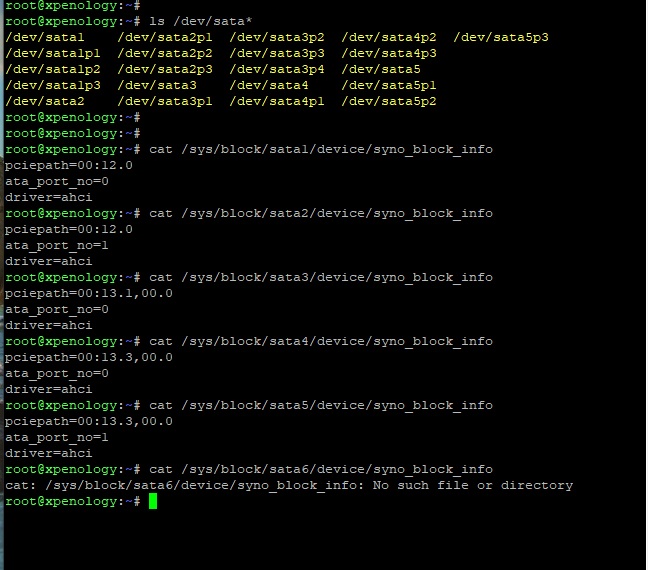
더욱 정확한 pcie_root 값과 ata_port 값은 아래 방식으로 얻을 수있다.
cat /sys/block/sataX/device/syno_block_info
X=1~6


얼른 한번 시도해 봐야겠네요..
소중한 정보 감사드립니다.^^
얼른 배워 노트북 구동하고자 합니다...
감사 합니다....
시놀로지 도커에서
우분투/데비안으로 빌드 는 못하나요
....간단한 빌드 구성은 어는것이 좋은 지요
화정큐삼 님 강좌에
시놀로지 ssh 접속에서도
빌드 되지 않고...있습니다,
툴체인만 사용하신다면
이미 시놀로지 리눅스 만으로도 충분해서 도커 안에 또 VM 리눅스가 필요하진 않을것 같습니다.
그 강좌란에 하단에 댓글로 필요한 커맨드들만 정리해 두었습니다. 참고해 보시기 바랍니다.
아래 파일은 제가 임시로 열어 드리겠습니다.
이 파일 받으셔서 헤놀에서 수정으로 밀어 넣으시고 다시 빌드해 보시기 바랍니다. 343M 정도 됩니다.
http://dante90.ipdisk.co.kr:5000/sharing/JWSCSKxlU
지금 방금 다시 켰습니다. 5분뒤 접속해 보시구요.
받으신 이후엔 좀 다시 알려주십시요.
model_ds1621p.dtb 파일을 미리 복사해 두고 그 후에 auto 빌드로 마치면 좋은데,
이 파일을 미리 복사해 두면 첫번째 auto 과정에서 model_ds1621p.dtb 가 깃헙의 오리지널 파일로 덮어써져 버려서 애써 만들어둔 dtb 정보가 날아가 버립니다.
첫번째 이미지 파일을 지우라고 하신 이유가 그것때문입니다.
그래서 최초 auto 후에 복사한 수정된 model_ds1621p.dtb 는 보존이 되어 남아 있게 되구요.
두번째 auto 로 비로소 수정된 model_ds1621p.dtb 를 활용한 정상 이미지가 생성이 됩니다.
lspci -tnnvq | egrep "ATA|SCSI|IDE" | grep -v "Ethernet" | sed "s/.*+-/00:/g" | sed "s/-\[.*\]----/,/g" | awk '{print "pcie_root = \""$1"\";"}'
요로케 해주시면 첨에 주소 뽑아내실 때 좀 더 편하게 뽑아내실 듯 합니다~
혹시 인텔 랜드라이버 추가 할수있는 방법이 앖는가요?
저는 아무리해도 빌드과정에서 추가를 하면 하드디스크를 찾을수없더군요.
설치완료후라도 추가를 할수없는지요?
이제 겨우 Tinycore 적응하고 스크립트 만든거거든요 ^^;;
이건 굉장히 신세계같은데.
이게 모든 버전들에만 적용되는게 아니라 DS920+하고 DS1621만 하나 더있던거 같은데.. 암튼 그렇게만 해당되는건가요?
기존에 추가 드라이버 설치의 e1000 e1000e 이런게 아니고 말씀하시는 드라이버 전보 추가가 다른 이야기 인거죠?
볼수있는 정보를 정렬하고 넣어주고 하는건 제가 좀 담당 어떻게 하겠지만 이건 좀 공부를 해야 좀 따라갈꺼 같아요~
툴체인을 하는이유가 tinycore에서는 추가 설치같은걸 못해서 그런걸까요?
데비안11은 없어 화정큐삼님 강좌 중 docker를 이용해서 putty로 docker가 있는 NAS에 접속해 하고 있는데 입력하면 -ash: dtc: command not found 이렇게 나옵니다.
이럴 경우 어떻게 하는 것이 좋을까요? ㅠ.ㅜ